I was hunting around for a device suitable to use as a home server. Specifically I was checking Ebay for a Raspberry Pi Zero 2 W, and found they’ve all been bought by scalpers selling them for nearly twice MSRP. And sure, that’s only $25, but I still have to buy a storage device, and I’m completely broke right now. I also have an ideological aversion to e-waste.
Then, somehow, I remembered that I had an old Ouya laying around. When it originally came out, I was a teenager with delusions of competence, and its promise to be an open development platform excited me. Surely, this would be the thing that jumpstarted my career as a game dev.
Anyway the console was a massive commercial failure beyond its very successful Kickstarter campaign, and I’ve had a completely useless cube sitting around for the past decade and a half. I’d had aspirations to jailbreak it in the past, but there didn’t seem to be much point beyond just saying I’d done it.
Then, on a whim, I thought I’d check if PostmarketOS supported it. I didn’t have much optimism, since it’s an obscure device, and at first glance I didn’t see it on the list. But then I noticed “tegra armv7” on the list of testing platforms. And, a little reading later, I see that includes the Tegra 3 that the Ouya is running on.
Of course since it is an obscure device, there weren’t any tutorials on how to install it on the Ouya specifically. I had to synthesize a few different guides, which wasn’t that hard, but idk. I guess I figure when I successfully do something weird that I didn’t have a good tutorial for I should probably post a good tutorial for it. Just in case someone else ever wants to do it.
So anyway.
A tutorial on how to do it
You will need:
- Your test subject (the Ouya)
- A 2mm hex key/screwdriver (I actually used a Torx key but I don’t recommend doing that)
- A spare HDMI-capable monitor and cable
- A spare USB keyboard
- A micro-USB cable
- A power adapter (barrel jack, 12VDC, maximum 1.5A). I don’t have my original one, so I grabbed a random one that turned out to put out 24VDC and 0.8A. I’m kind of surprised that didn’t kill it, in hindsight. I didn’t even check the specs. Guess they put a decent regulator on the thing.
- A computer running Linux. Mine was running elementaryOS (I haven’t bothered switching it over to Fedora yet)
First, prepare the software side of things. You’ll need to clone the git repos for:
- re-crypt
- fusee-tools - make sure to clone this recursively, you need the submodules!
- u-boot
Then, install dependencies. These are for Debian-based distros, if you’re using something else you’ll need to translate them into the appropriate packages for your system.
sudo dpkg --add-architecture i386
sudo apt update
sudo apt install autoconf bash bison build-essential fastboot flex gcc-arm-none-eabi git \
  libgnutls28-dev libncurses-dev libssl-dev make python3-cryptography python3-dev \
  python3-setuptools python3-usb swig libc6:i386 libstdc++6:i386 zlib1g:i386
Do not skip those 32-bit packages. They are required for the nvflash utility to run properly.
Build stuff
Next, in the directory containing u-boot, run:
make mrproper
make ARCH=arm CROSS_COMPILE=arm-none-eabi- ouya_defconfig
make ARCH=arm CROSS_COMPILE=arm-none-eabi-
You can speed up that last command by adding the -jN option, where N is the number of threads your processor has. It just runs compile commands in parallel when it can.
This will produce the u-boot image, called u-boot-dtb-tegra.bin. Copy it to the re-crypt and fusee-tools directories.
Then go to the payloads directory in fusee-tools and run:
make ARCH=arm CROSS_COMPILE=arm-none-eabi- -j1
I don’t know why the libre-tegra guide specified -j1. I’m assuming it breaks if you try to parallelize. It’s fast to compile though so it doesn’t really matter.
Backup
At this point the libre-tegra guide describes how to back up the Google Nexus 7. This backup process is apparently device-specific, and I didn’t want to spend time figuring out how to do it for the Ouya, since the thing is useless to me if this doesn’t work anyway. I definitely should have though! Don’t be like me, be smart and be safe! Don’t leave yourself without a way to recover your device.
It seems to involve booting into APX (see the next section), loading the appropriate device bootloader from this repo, and using nvflash to pull a bunch of data to backup images. I don’t know how you figure out which images are needed to fully back up any specific device, though.
Prepare u-boot
Now’s when we start with the fun stuff. First, you have to boot the Ouya into APX mode. The tegra30-debrick guide provides two ways of doing this. The first is to bridge pin 5 of a specific IC to ground. The second is to short two solder pads labeled U33. I found the second method to be far and away the easier method. Just short the pads, hit the power button, and you’re in. The other method is finicky and seems to have a timing to it. I managed to do it once but couldn’t seem to replicate whatever I did that worked. 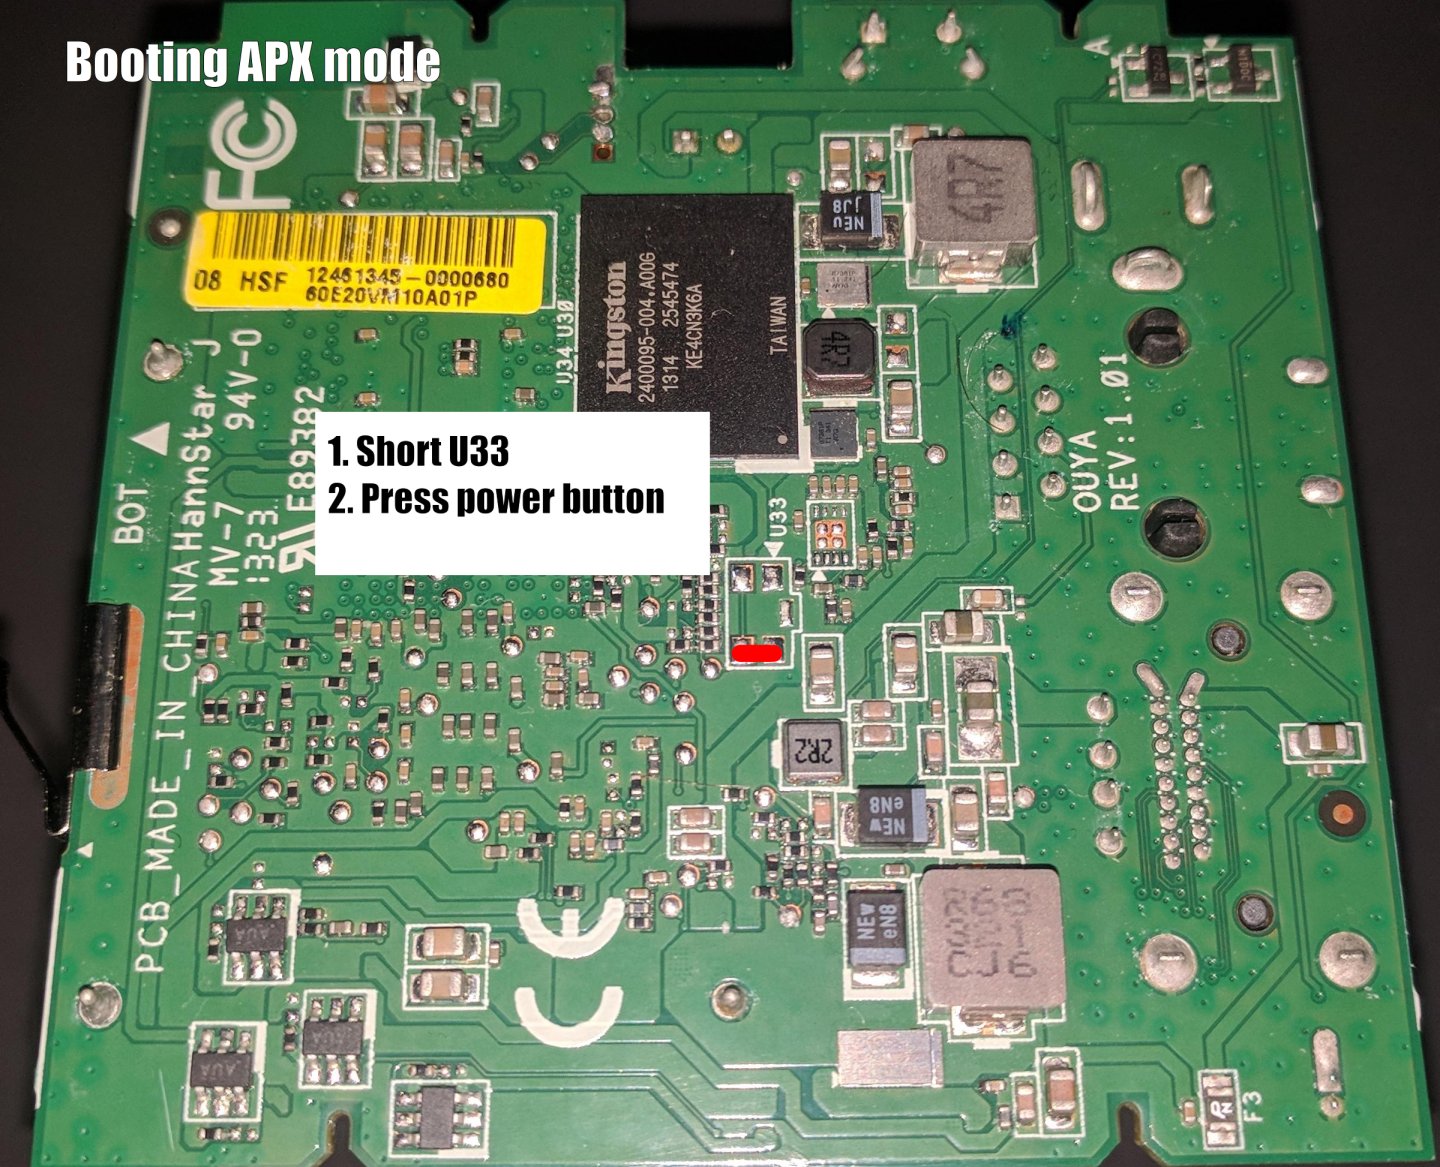
If you’ve done it right, and you have the micro-USB cable connected to your computer, running lsusb should include a line like:
Bus 002 Device 055: ID 0955:7030 NVIDIA Corp. T30 [Tegra 3] recovery mode
Before you can flash u-boot, you need to prep it with re-crypt to get a usable partition layout. And to do that, you need your Ouya’s Secure Boot Key.
In the fusee-tools directory, run ./dump_sbk.sh -s T30. It will output a bunch of text. What you’re looking for is a line like this:
#Dumped SBK [ 0xXXXXXXXX 0xXXXXXXXX 0xXXXXXXXX 0xXXXXXXXX ]
The Ouya will reboot when you do this. That’s fine, just turn it back off.
Everything between the square brackets is your specific SBK. Now switch to the re-crypt directory, and run this command, substituting in your SBK:
./re-crypt.py --dev ouya --sbk 0xXXXXXXXX 0xXXXXXXXX 0xXXXXXXXX 0xXXXXXXXX --split
That will produce two files, bct.img and ebt.img. Copy both to the fusee-tools directory, and switch back there.
Flash u-boot
Now, finally, you get to actually boot custom firmware. Boot the Ouya back into APX mode, and run this command (in fusee-tools):
./run_bootloader.sh -s T30 -t ./bct/ouya.bct
If everything has gone well, you should see u-boot’s console output on your monitor. Quickly hit Ctrl-C on the connected USB keyboard to interrupt u-boot! Otherwise, it will try and fail to find an operating system to load, and then reboot.
At this point, you haven’t actually flashed u-boot, you’ve just used the fusee-gelee vulnerability to inject u-boot as a payload. If you’re familiar with Switch hacking, you know the difference; you have to re-inject the payload on every boot. Luckily, we won’t have to do that here, because we can actually replace the bootloader entirely with u-boot.
In u-boot, run the bootmenu command, then use the arrow keys to highlight the fastboot option, and press Enter.
Then, on your computer, run:
fastboot flash 0.1 bct.img
fastboot flash 0.2 ebt.img
fastboot reboot
You have now flashed u-boot! The Ouya should boot directly into it now, and every time you press the power button from now on.
Install PostmarketOS
On the Ouya, use Ctrl-C to interrupt the u-boot startup sequence, and again run bootmenu. This time, choose Mount internal storage (or something similar; it was the first option for me). This will expose the Ouya’s eMMC as a USB storage device. If you run lsblk on your computer, you should see it assigned to something like /dev/sdX. You can identify it by its size, it should be 8 or 16GB depending on which model of Ouya you have.
Download a pre-built PostmarketOS image from the website. Then, in the directory containing the image, run (replacing things with your specific file names and device paths):
xzcat xxxxxxxx-xxxx-postmarketOS-channel-ui-nvidia-tegra-armv7.img.xz | sudo dd of=/dev/sdX status=progress
This took about an hour for me. You can probably speed it up by raising the block size with an option like bs=4M, but I didn’t do that.
Once that finishes, you should be able to power cycle the Ouya and it’ll boot right into PostmarketOS. Congratulations! Don’t forget to reassemble the thing.
One small awkward thing I noticed is that, when it’s booted into PMOS, the power light will repeatedly flash in groups of two pulses. Not sure what that’s about or how to fix it. I think it’s just cosmetic though.